Sunday, January 10, 2010

Aunt Renee's Chicken Stir Fry


This is a family staple. I made it the other day and decided to snap a picture so it could forever be apart of our family meals :) (via the blog)

The way I made it this time reminded me of the "chicken and broccoli" dish you'd typically get from a Chinese restaurant. You could serve it with fried rice or egg rolls or crab rangoon and have fortune cookies and make it an oriental meal. (Not that I have ever done this, but sounds delish, huh?)

I have made a few changes from the original recipe out of the ward cookbook.

Aunt Renee's Chicken Stir Fry
Printable Version

1 lb boneless skinless chicken breast, cut into bite size pieces
3T EVOO
2T minced onions
1 clove of garlic
2c chicken broth
2T brown sugar
2T soy sauce
2T fruit juice (any kind)
2T cornstarch
16oz frozen broccoli* (approx 4cups)
peanuts to garnish*
2c rice

Heat oil in skillet. Add chicken, garlic and minced onions. Cook until chicken is done. Add frozen broccoli and 1 cup of chicken broth. Put lid on and simmer until broccoli is desired tenderness.

In a separate bowl (I use a 2 cup liquid measuring cup) mix brown sugar, soy sauce, fruit juice and cornstarch. Stir with with fork until cornstarch is no longer lumpy.

When broccoli is ready, pour in the soy sauce mixture. (Stir soy sauce mixture right before you pour it in your skillet b/c the cornstarch will settle to the bottom and you need it to thicken your sauce) Stir soy sauce mixture into your skillet. As this heats throughout, the sauce will thicken. If it gets too thick add some of the remaining chicken broth until desired consistency.

Serve over rice. Sprinkle with peanuts.

*Note: The original recipe called for blanched sliced carrots and sliced green peppers. My kids do much better with the broccoli. You can use fresh veggies if you'd rather. You can also use the California mix of frozen veggies (cauliflower, carrots and broccoli). My kids would just pick out the broccoli and carrots. I would've used carrots the day I made this but I was out. So really you can use your family's favorite stir fry veggies. This meal is super versatile and any veggies you have in fridge and freezer would probably work fine. (I wouldn't personally use corn or peas... just a personal opinion)

Also you could use cashew instead of peanuts if you wanted to do like a cashew chicken dish.

Again, very versatile!

Recipe adapted from Aunt Renee T.

Monday, January 4, 2010

Pomegranate Cheesecake


Pomegranate Cheesecake
Printable Version

Crust:
1/2 cup butter, softened
1/4 cup packed brown sugar
1 egg
1 1/4 cups all purpose flour

Filling:
4 8-oz. packages cream cheese, softened
1 1/4 cups granulated sugar
1/4 cup all purpose flour
3 eggs
1 tablespoon vanilla
1/2 cup sour cream (reduced fat worked great)
1 teaspoon finely shredded lemon peel
3/4 cup pomegranate seeds

Topping:
1 1/2 cups sour cream (again, reduced fat worked great)
1/4 cup sugar
1 teaspoon vanilla

Pomegranate Glaze:
1-16-ounce bottle pomegranate juice (usually found in the refrigerated section of juices)
1/4 cup brown sugar
1 1/2 tablespoons cornstarch

1/2 cup pomegranate seeds (tutorial on de-seeding here)

For the crust: preheat oven to 350 degrees. In a mixing bowl beat butter on medium high speed for 30 seconds. Add brown sugar. Beat until combined. Add egg; beat well. Beat in flour until combined. Divide dough in half. Cover one portion and set it aside.

Remove the sides from a 10-inch springform pan and set aside. Spread first portion of dough on just the bottom of ungreased springform pan base, spreading dough almost to the edges. Place on baking sheet. Bake for 10 minutes. Cool completely. When cool, attach sides of pan. Press chilled dough onto the sides of the sprinform pan to a height of 1-3/4 inches, using a thin metal spatula, like an offset spatula, to spread dough.

For the filling: reduce oven temperature to 325 degrees. In an extra-large mixing bowl beat cream cheese and sugar until fluffy. Beat in the flour on low speed until smooth. Add eggs and vanilla all at once, beating on low speed just until combined. Mix in sour cream and lemon peel. Then, using a wooden spoon or a spatula, gently fold in pomegranate seeds (if you use the electric mixer for this part, the seeds will burst and stain the filling with the juice - and it won't look as pretty).

Pour filling into crust-lined pan. Place on baking sheet. Bake for 65 minutes or until edges are puffed and center jiggles slightly when gently shaken. Remove from oven. (It doesn't matter if the cheesecake cracks on top since it will have a sour cream topping.)

For the topping: stir together sour cream, sugar, and vanilla. Spread sour cream mixture over top of baked cheesecake, spreading gently to the edges. Return to oven; bake for 10 minutes. Remove from oven. Cool on wire rack for 15 minutes. Loosen crust from sides of pan. Cool for 30 minutes more. Remove sides of pan; cool completely. Cover; chill 4 hours or overnight.

For pomegranate glaze: in a medium saucepan bring pomegranate juice to boiling; reduce heat and boil gently, uncovered, until reduced to 1 cup (12 to 15 minutes). In a separate bowl, stir together brown sugar and cornstarch. Add to juice. Cook and stir until thickened and bubbly. Cook and stir 2 minutes more. Transfer to a medium bowl; cover surface with clear plastic wrap. Cool to room temperature. Store, covered, in refrigerator until serving time.

When ready to serve, remove cheesecake and pomegranate glaze from refrigerator 15 minutes before serving. Spoon some sauce over top of cheesecake; pile remaining pomegranate seeds in center of cheesecake. To serve, slice cheesecake. Pass remaining sauce. Makes 16 servings.

Recipe by MyKitchenCafe

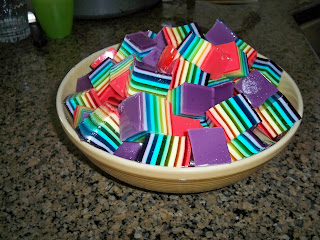
Rainbow Jello


Rainbow Jello
Printable Version

2 small packages of red jell-o
2 small packages of orange jell-o
2 small packages of yellow jell-o
2 small packages of green jell-o
2 small packages of blue jell-o
2 small packages of purple jell-o
1 lb sour cream

Step 1
Boil water on stove. Take 1 cup of boiling water and mix with with 1 small package of purple jell-o until dissolved. Add 1/3c sour cream. Mix with wire whisk until creamy. Pour into bottom of 9x13. Refrigerate until set. (approx 1hr)

Step 2
Boil water again. Take 1 cup of boiling water and mix with other package of small purple jell-o until dissolved. Add 3T of cold water. Pour on top of the set creamy purple layer. Refrigerate until set (approx 1hr)

Repeat steps 1 and 2 for all flavors of jell-o.

The obvious: You can use any flavors of any colors in any order you desire :)

Julie's Tips:
In a traditional 9x13 I can only get 10 layers (5 creamy/5 clear). If I use a 9.5x13.5 or 10x14 I can get all 12 layers (6 creamy/6 clear).

If going for a high level of presentation, spoon off all air bubbles that are formed from mixing jell-o as you pour each new layer. It gives each each layer a much sharper look. (If I am just making it for this or that I will just spoon off air bubbles for the top two layers (creamy red/clear red).

I think ENDING with clear red is the prettiest.

I always put them in order of the rainbow from top down. ROYGBV.

I pick flavors that I like. If you don't like lemon, leave it out. There are usually tropical flavors such as pineapple, green apple, etc. (Beware of peach, it doesn't give a true 'orange' color.) Also, going with traditional strawberry for red gives pretties top layer.

Give yourself 2 days to make this. You can make it in one day but the longer you let each layer set up the better off you will be. Plus, for one day, you have to stay pretty close to your stove ALL day. Do half a day, much more enjoyable. :)

Make sure the shelf in your fridge is level, or each layer will look like a wedge.

When pouring hot jell-o on chilled layer pour slowly and not all in one spot or the hot jell-o will break the top layer, thus mixing the layers you were trying to keep separate.